
Behind Briiv Pro
Prototyping And Designing The Electronics
We wanted to share some behind the scenes of developing the electronics that go inside Briiv Pro. We had already made samples of the electronics, but wanted to add some slight improvements that would help the longevity of Briiv Pro after using and testing it for a few weeks.
The boards are built up in four layers on top of each other with internal wires, or tracks as they are called in the industry, running between all the various LEDs and microchips. The layout is important to protect some parts and to ensure the touch controls work as expected.

We then moved to making some rudimentary prototypes, using copper foil cut on a modified vinyl cutter to test and experiment with different touch sensor shapes and styles affecting just one of the four layers in the design.

These tests were then taken and applied to computer generated layouts ready for the next round of prototypes.

At the end of that we had a fully functional and highly tuned Briiv Pro board!
PCB Pre-Production Run Has Started
In January we officially finalised the electronics ready for production!
We sent the PCB files to the manufacturer and commissioned a final pre-production run for the electronics, so the manufacturer could run some trials and we could check to see if any final tweaks were needed to make sure the production run went smoothly.
This should all be done before the end of February, so we can order the final production run straight after this.
Deep Into The Programming
Since all of the longest lead time parts were in pre-production and sampling, we began the next big task of overhauling the firmware. This is the program that runs on the tiny brain inside of Briiv Pro.
We have increased Briiv Pro's brain size from the original Briiv so that it can handle more commands and do things a little bit faster than before. We have the original program for Briiv that we've spent two years refining, so a lot of the ground work is done already, but for the Pro we wanted to add some improvements to make it more responsive and more reliable all round.
One of the things we have just improved is the capacitive touch controls. We spent quite a bit of time playing around with some code that was developed by NASA to protect electronics during a rocket launch and keep the electronics working when exposed to the unpredictable nature of space!
We have used this and somewhat over engineered a highly tuned touch control that can recognise your finger and not get accidentally get set off by a WhatsApp message, random moth, or that trip into space…
Work Begins On The App Updates For Briiv Pro
As we neared the end of the campaign and since we were fully funded, we opted to get a head start on getting the existing Briiv app updated, so that it’s ready for when Briiv Pro arrives with us. We had some features already working in the app but not in a visual way that would be easy to use for people, so we brought in some external help with designing this and improving the user interface.

Backwards Compatibility
As we worked through all of the software updates and improvements, we also ensured that the same tweaks and improvements can be applied to existing products in-keeping with our ambition to remove design obsolescence. So, all the software improvements made to Briiv Pro will also benefit all our existing Briiv's out there, and some improvements have already been rolled out!
Questions From The Briiv Community
Here we will answer some questions we've had in private messages that we thought you guys might find interesting!
What Is The Real Benefit Of Briiv Pro?
We designed Briiv Pro to be super compact, which means it can find a home in any room of your house, whether nestled between plants or pride of place on your coffee table. Where a big bulky unit is great at cycling the air in one room very efficiently, they can’t effectively pull air from other rooms around your house and you don’t really want to have a large white box in every single room of your home… That’s why we created the Briiv Pro ‘Zone Mode,’ to clean your entire living space, without adding unsightly appliances to your home.
How To Optimise Zone Mode
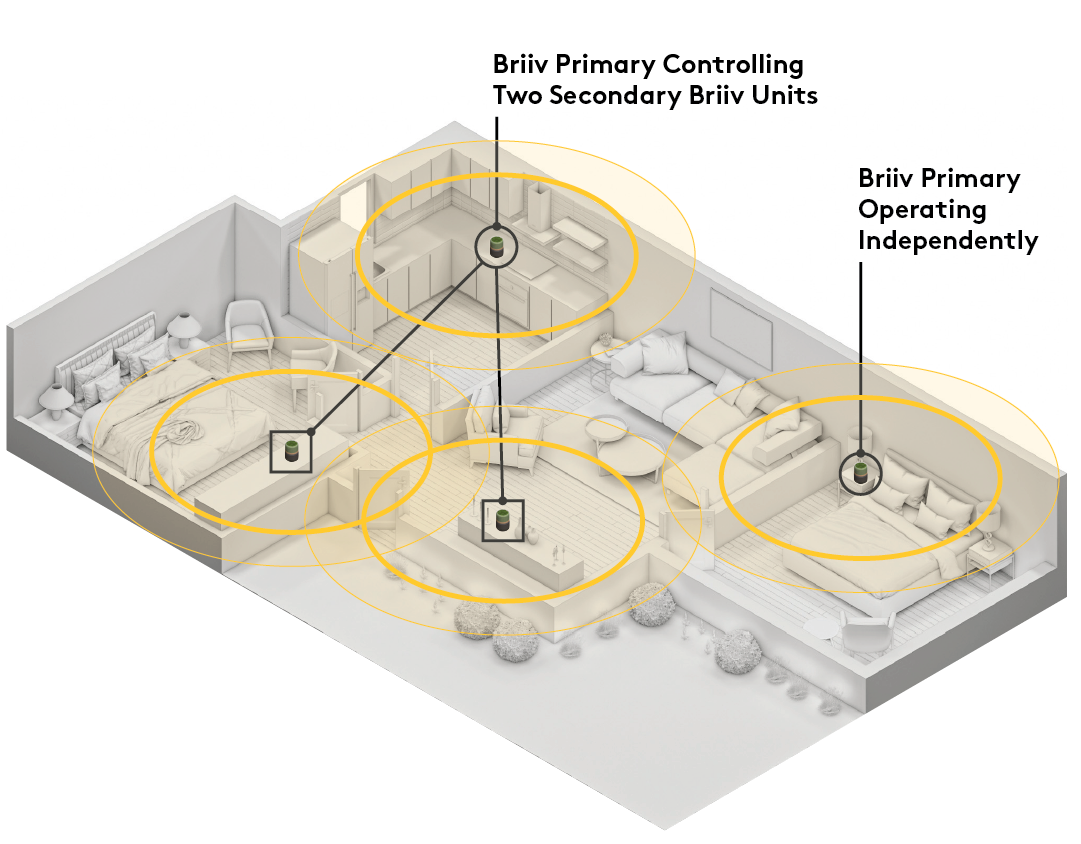
Zone mode links multiple Briiv units together to create a smart network that looks after every room of your home.
The Primary Briiv Pro has inbuilt intelligent AQI sensors. These units should be placed in areas like kitchens, which are a source of air pollution. Isolated areas of your home will also benefit from a Primary Briiv Pro as these will be somewhat cut off from any internal air movement and will need their own AQI monitor.
The Secondary Briiv Pro has basic functionality such as scheduling and fan speed adjustment, then when connected to a Briiv Pro in Zone Mode it will mirror everything the Primary does. When rooms are adjoining, or in a large open plan living space, this is a perfect situation to create a Zone.
Below is an optimal scenario and links two Secondaries with a Primary that is placed in the kitchen. A second Primary is required in the far bedroom as the air in this room will be less affected by any air pollution created in the kitchen, therefore it should be treated as a separate Zone.

This is a basic example using the kitchen as a primary source of air pollution, however there are many more causes of poor indoor air quality! If you own a pet, or have a wood burner in your home these can both produce poor air quality, and of course opening windows lets the outside pollution in. Please take this into account when deciding where your Primary units should be placed. If in doubt we’re always happy to help advise, so just send us a message or head over to the Briiv Community.
Related Posts
-
At Home With Nature: What is Biophilic Design, and How Can I Incorporate It Into My Space?
What is biophilic design? Biophilic design is the principle of incorporating nature into the design process and style...
-
How to Get a Better Night’s Sleep
A good night of sleep is crucial to support your health and wellbeing. While a one-off late night or restless evening...
-
The A' Design award
More Outstanding Recognition for briiv We are thrilled to announce we are the recipients of yet another prestigious d...


